Java & Spring
[Spring] 입문1(feat. 인프런 김영한님 강의)
심심231
2021. 8. 14. 21:45
Spring 입문1(feat.인프런 김영한님 강의)
Spring boot 기초
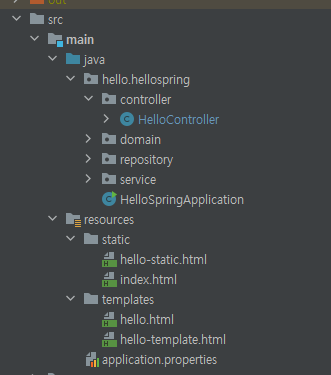
우선 오늘 공부한 내용의 폴더 구조는 다음과 같다. 프로젝트는 HelloSpringApplication 파일에서 시작된다. Controller는 요청이 들어왔을 때 이를 받아서 처리해주는 부분이고, resources는 정적 컨텐츠를 저장하는 부분인데 단순 정적 컨텐츠와 템플릿 엔진을 썼을 경우를 위해 static, templates로 분리해주었다. 그 외에 service나 다른 파일들은 다음 강의에서 설명한다.
- 정적 컨텐츠
// java/hello.hellospring/controller/helloController.java @Controller public class HelloController { @GetMapping("hello") public String hello(Model model) { return "hello"; } }- 파일을 그냥 내려주는 방식
- @GetMapping("hello") => 요청 uri가 localhost:8080/hello
- return "hello" => resources/templates/hello.html을 화면에 띄워라
- 즉, 컨트롤러에서 리턴 값으로 문자를 반환하면 viewResolver가 화면을 찾아 처리
- resources:templates/{viewName}.html
- MVC와 템플릿 엔진
<!-- resources/templates/hello-template.html --> <!DOCTYPE HTML> <html xmlns:th="http://www.thymeleaf.org"> <head> <title>Hello</title> <meta http-equiv="Content-Type" content="text/html; charset=UTF-8" /> </head> <body> <!-- data는 controller에서 선언해준 model의 key값 --> <p th:text="'hello. ' + ${name}" >hello! empty</p> </body> </html>// java/hello.hellospring/controller/helloController.java @Controller public class HelloController { @GetMapping("hello-mvc") // api url이 localhost:8080/hello-mvc?name=spring 이 됨 public String helloMvc(@RequestParam("name") String name, Model model) { model.addAttribute("name", name); return "hello-template"; } }- 관심사 분리를 위해 Model, View, Controller로 쪼개는 방식
- View 부분에 템플릿 엔진을 이용해 html을 처리해줌
- @GetMapping("hello-mvc") => 요청 uri가 localhost:8080/hello-mvc
- @RequestParam("name") => 요청 uri가 localhost:8080/hello-mvc?name=홍길동
- query 인자로 필수로 추가해서 요청해야할지 여부는 @RequestParam("name", required=false)로 설정할 수 있음. Default는 true
- return "hello-template" => resources/templates/hello-template.html을 화면에 띄워라
- 즉, 컨트롤러에서 리턴 값으로 문자를 반환하면 viewResolver가 화면을 찾아 처리
- resources:templates/{viewName}.html
- 여기서는 템플릿 엔진을 사용해서 모델에 name이라는 데이터를 넣어서 html파일에서 처리해줌
- Api
// java/hello.hellospring/controller/helloController.java @Controller public class HelloController { // 문자열로 보내기 @GetMapping("hello-string") @ResponseBody public String helloString(@RequestParam("name") String name) { return "hello " + name; // 이 문자가 그대로 http body에 담겨져 내려감 } // 객체로 보내기 @GetMapping("hello-api") @ResponseBody public Hello helloApi(@RequestParam("name") String name) { Hello hello = new Hello(); hello.setName(name); return hello; // {"name": "들어온 인지값"} 처럼 json 형태로 반환 } // getter setter를 가진 클래스 생성하기 // 변수는 private으로 접근할 수 있는 getter setter는 public으로 해서 getter setter 통해서 접근함 // property 접근 방식이라고도 함 static class Hello { private String name; public String getName() { return name; } public void setName(String name) { this.name = name; } } }- view없이 string이나 json 형태로 반환해주는 방식
- @ResponseBody => 뷰 리졸버를 쓰지 않음. 대신 return 할 때 http의 body에 담아서 전송
728x90
반응형